


Action! Common issues, questions, and how to fix them
Mirillis Action! Game Recorder
1. Blocked website
You can’t access the website, the store, or the download page is down?
Error 104 occurs if the user has blocked our website, its hosts or IP address in firewall or in a hosts file. It’s usually caused by third party “activators” for Action. To remove this kind of activity please follow these steps:
To remove this kind of activity please follow these steps:
1. For firewall blocking rules: Go to your Windows Firewall with Advanced Security. Then from the left menu select Outbound Rules. Find following IP address: 176.31.241.10 right click on it and select Delete. Find following IP address: 91.121.143.139 right click on it and select Delete.
2. For hosts file: Localize your host’s file (%WINDIR%\system32\drivers\etc\hosts). Open it as administrator using notepad.
Find following lines:
127.0.0.1 http://mirillis.com
127.0.0.1 http://www.mirillis.com
127.0.0.1 http://serwer2.paka-service.com
127.0.0.1 http://ns386119.ovh.ne
127.0.0.1 mirillis.pl
Delete all those lines above and then save your hosts file. After all these steps were taken please reboot your PC. If you have followed steps above properly you should be able to use our software properly
2. How to create PC Dx Diag report
PC DX Diag report will help us investigate your problem. To run a DxDiag report follow the steps below:
If you are running Windows Vista or higher go to your taskbar.
Click on, “Start Button”.
Click on, “Run”.
In the pop-up window enter DxDiag and hit ok. The DirectX Diagnostic Tool pop-up window should appear.
Click on, “Save all information tab”. “Save As” window should be present.
Click on, “Save” (The file should be saved to your desktop as DxDiag) Close the DirectX Diagnostic Tool.
3. Problem: Invalid activation key
This problem often occurs when you type the activation t manually. It’s almost impossible to recognize I from l (uppercase i, lowercase L). The problem may be also caused by spacebar, that was accidentally typed at the beginning of the key.
Solution: Make sure that your serial number is typed properly and you have filled all required fields. The easiest way to activate our software is to copy and paste your serial number into activation window. You will avoid any mistakes that may happen during manual retyping.
Watch a video: Mirillis Action! Activation tutorial
4. Problem: Microphone is not being recorded / System sound are not being recorded, only microphone is
Solution: In Action! in the main tab enable Microphone Checkbox, in Audio Settings tab enable “Record system sounds” option and select your speakers/headphones from audio devices list. In Microphone Settings tab, select your microphone as an audio device, adjust microphone volume and audio balance.
5. Problem: screen flashing when starting Action!
Solution: update/reinstall video drivers. Also, make sure Action! does not run in compatibility mode.
6. Problem: no audio in recordings
Solutions:
– go to Audio Settings tab and enable “Record system sounds option”.
– disable Nahimic software
– disable Asus Sonic Suite
7. Problem: Error 103
Solution: disable antivirus and reinstall Action!, add Action! files to the antivirus software whitelist
8. Problem: Action! hangs when saving longer MP4 recordings
Solution: disable antivirus software.
The problem is related with antivirus software (in our case Avast!) as it scans every newly created MP4 file and it may take a very long time if the file is big.
To solve this problem please add Action! to your antivirus software exclusion list (white-list).
9. Problem: Action! crashes when recording Call of Duty WWII
After the lastest update of Call of Duty: WWII you can experience problems the game compatibility with Action!
The game crashes when Action! tries to connect to it.
Temporary workaround to this problem in three steps:
– add the game to the excluded list
– run the game in borderless fullscreen mode
– set Action! in Active Screen recording mode.
To add a game to excluded list open notepad and type:
s2_mp64_ship.exe
s2_sp64_ship.exe
Save the file as an exclude.txt and put it in Action! folder.
Now start Action! and select Active Screen recording mode (one for
desktop recording).
Run Call of Duty: WWII and go to Settings -> Graphics and Display Mode
set to “Windowed (no border)” or “Windowed (no border extend)”.
Action! HUD should show up in the game and you are now ready to record/stream
your video.
10. Problem: Action! crashes when recording Black Ops 3/ Black Ops 4
The game crashes when Action! tries to connect to it.
Temporary workaround to this problem in three steps:
– add the game to the excluded list
– run the game in a borderless fullscreen mode
– set Action! in Active Screen recording mode.
To add a game to excluded list, open Action!, go to Setting -> General. Click a three dot icon next to “Exclude processes”.
Add following files to the exclude list:
BlackOps3.exe
BlackOps4.exe
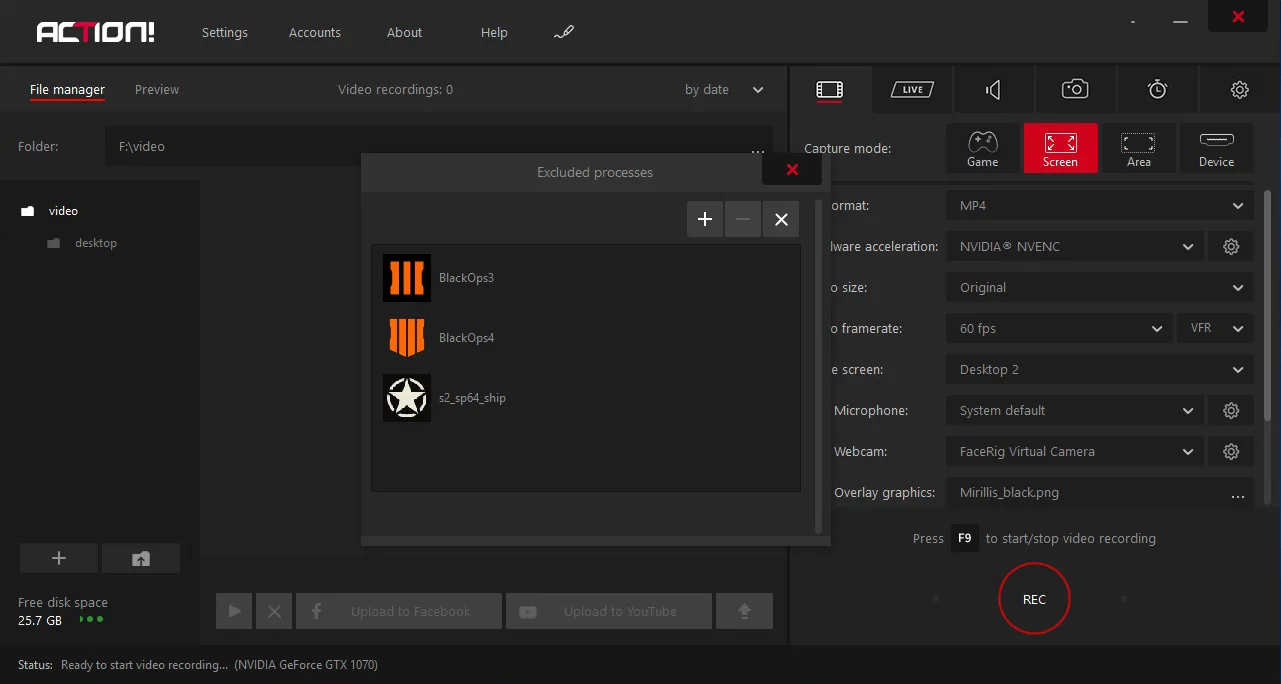
Now start Action! and select Active Screen recording mode (one for desktop recording).
Run Black Ops 3 (or Black Ops 4) and go to Settings -> Graphics and Display Mode
set to “Windowed (no border)” or “Windowed (no border extend)”.
Action! HUD should show up in the game and you are now ready to record/stream
your video.
If you experience no. 9 and 10 issues, please contact the Activision support.
11. Destiny 2 – instructions for safe and high-performance Destiny 2 game recording with Action!
To make sure that Action! doesn’t hook up to the game you can add destiny2.exe to the excluded list.
To do that open notepad and type: destiny2.exe
save the file as an exclude.txt and put it in Action! folder.
If you already have exclude.txt file in Action! folder, open that file, add destiny2 in new line and save the file.
12.Any problem with action
If you still have any problems with Mirillis Action! Screen recorder, please try following steps below to completely re-install Action.
1. Uninstall Action!
2. Press Start and then type “Regedit” in search and press Enter.
3. Go to the following path: HKEY_CURRENT_USER/Software/Mirillis/
4. Remove Action! catalog.
5. Reboot your PC.
6. Install Action! again. These steps should restore your Action! settings to default.
We hope that you have found a solution. If you still can’t fix the issue, you can always contact our technical support team via the contact form.